You can click on each of my photos to make them larger if you need to. This is a picture of the finished gift bags I made.
The first thing I did was to use the Fancy Favor die and cut out my box. If you decide to purchase this die you'll want to remember this is an extra large die and you will need to purchase the extended cutting pads (unless of course you already have them). I used one sheet of 12"x12" piece of card stock and its perfect if you cut it in half because then you can make 2 boxes. You will also need a coordinating sheet of 8 1/2" x 11" card stock for the handle- I have more details about the handle posted below.
And here is my box after I ran it through my Big Shot machine. It's hard to see in this photo but this die will score the fold lines for you.
At this point you can go ahead and fold along your score lines. Make sure that you DO NOT fold your box along the score lines on the narrow side of the box. You will want to use those score lines when you are making a party favor or tying the box closed. Again, if you want to keep this in the shape of a box it's important that you do not score along the side score lines along the smaller sides.
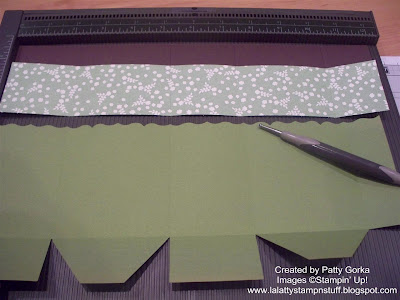
If you are using any designer series paper or additional card stock to decorate your box you will need to score it so that it fits around the outside of the box. To do this I simply lined up the score folds of my box with my paper and using that as I guide I scored my paper. If the score lines from your box are in the hill part of your score board (like mine were) you will need to score your paper at the next/bigger score line- otherwise your card stock will be too small and it will not fit around your box (ask me how I know this....LOL).
Next, you can begin assembling your box. You will want to use sticky strip tape for this part because it's strong enough to hold your box together plus you want your box to stay together once you put a nice little surprise inside. You'll notice in the background of this photo that I punched along the bottom of my chocolate chip card stock using my scallop trim border punch and then I adhered my dsp and card stock together.
In this photo I just wanted to show you again to not score along the score lines on the smaller side of the box. The score lines are there, but once your box is finished you will hardly see them.
Here, you will see that I went ahead and placed my designer series paper portion of my project onto my box. And now is when you can begin to make your handle. I cut a strip of card stock measuring 11"x 1" and then I scored each end at 1".
I used my horizontal slit punch to punch out an area to place my card stock through. Once you slip your card stock through the opening, fold the scored end up and using your hole punch, punch a hole for your brad. If you don't have a slit punch you can use a word window punch, but your opening will be larger than you need (you could make your handle wider to compensate). You could also place your folded end inside your box and use a brad like I did to hold it in place.
And here is what my finished handle looks like. I did this to both sides.
Next, I placed the lollie I made onto my bag using my glue gun. I have found that the glue gun is the best adhesive when you are working with making lollies.
Once your project is complete just add some tissue paper and you're done and since I cut a 12" x 12" piece of card stock in half I was able to make 2 of these gift bags. 
And if your still here and reading all the way to the bottom of my post, I'd like to thank you for taking the time to stop on by and visit. I hope you enjoyed my project today! Have a great weekend!

And if your still here and reading all the way to the bottom of my post, I'd like to thank you for taking the time to stop on by and visit. I hope you enjoyed my project today! Have a great weekend!
Stamps: None
Card Stock: Old Olive, Chocolate Chip, Very Vanilla, Holly Berry Bouquet DSP (from the current Holiday Mini)
Ink: None
Supplies: Big Shot, Fancy Favor XL Die, Holly Berry Bouquet Button (from the current Holiday Mini), Twine, Hole Punch, Brads, Slit Punch, Scallop Trim Border Punch, Simply Score Tool, Glue Gun
Technique: Paper Folding
Contact me today if you would like to place an order or to be added onto my mailing list!
My Stampin' Up! Website- http://www.stampinup.net/esuite/home/lalatty/
To place your Stampin' Up! order- http://www.stampinup.com/ECWeb/default.aspx
My email address- pebbles4@ptd.net


6 comments:
Super cute!! Thanks for sharing.
Anne
Another super project!
Those are really cute, Patty!
Great tutorial! These are too cute! :)
These are adorable! Thanks so much for the tutorial!
These bags are gorgeous, thanks for the tutorial! Hugs, Karen
Post a Comment